About
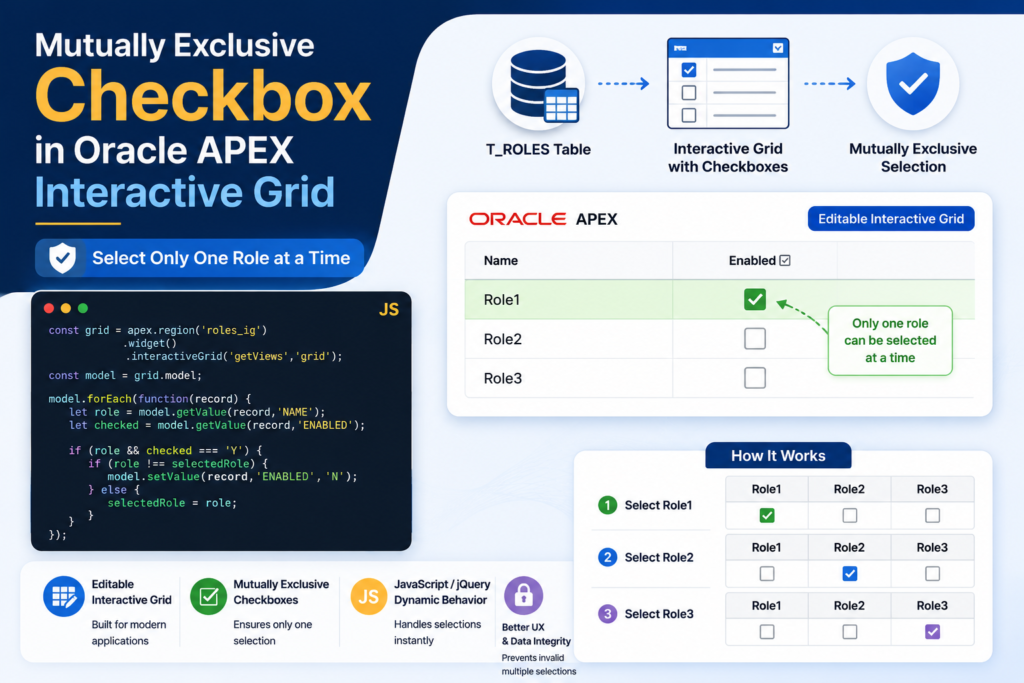
In Oracle APEX Interactive Grid, checkboxes are commonly used to enable or disable records. However, there are scenarios where only one checkbox should be selected at a time.
This blog explains how to implement Mutually Exclusive Checkboxes in an editable Interactive Grid using Oracle APEX and JavaScript/jQuery.
Business Scenario
Suppose we have three roles:
- Role1
- Role2
- Role3
A user should be able to select only one role at a time.
If Role1 is selected, Role2 and Role3 must automatically be unchecked.
Likewise, selecting any other role should uncheck the remaining roles.
This behavior is similar to a radio button group while still using Interactive Grid checkboxes.
Tools and Technologies
- Oracle APEX
- Interactive Grid
- JavaScript
- jQuery
Step 1: Create Sample Table
Create the table below.
CREATE TABLE T_ROLES
(
    ID NUMBER DEFAULT ON NULL
       TO_NUMBER(SYS_GUID(),
       'XXXXXXXXXXXXXXXXXXXXXXXXXXXXXXXX')
       NOT NULL,

    NAME VARCHAR2(30 CHAR),

    ENABLED VARCHAR2(1 CHAR),

    CONSTRAINT T_ROLES_ID_PK
    PRIMARY KEY (ID)
);
Step 2: Insert Sample Data
Insert sample records.
INSERT INTO T_ROLES(NAME, ENABLED)
VALUES ('Role1','Y');

INSERT INTO T_ROLES(NAME, ENABLED)
VALUES ('Role2',NULL);

INSERT INTO T_ROLES(NAME, ENABLED)
VALUES ('Role3',NULL);

COMMIT;
Sample Data
| Name | Enabled |
|---|---|
| Role1 | Y |
| Role2 | |
| Role3 |
Step 3: Create Editable Interactive Grid
Create an Interactive Grid based on the T_ROLES table.
SELECT *
FROM T_ROLES
Enable editing on the grid.
Step 4: Assign Static ID
Navigate to:
Interactive Grid Region
→ Attributes
→ Static ID
Set:
roles_igThis Static ID will be used in JavaScript.
Step 5: Configure Columns
NAME Column
Set:
Type = Display OnlyUsers should not modify role names.
ENABLED Column
Set:
Type = CheckboxCheckbox Settings
Checked Value
YUnchecked Value
NStep 6: Create Dynamic Action
Create a Dynamic Action.
Event
text Change
Selection Type
Column(s)Column
ENABLEDStep 7: Add Execute JavaScript Action
Create a True Action.
Action
Execute JavaScript CodePaste the code below.
// Get the grid instance
const grid = apex.region('roles_ig')
                 .widget()
                 .interactiveGrid('getViews', 'grid');

const model = grid.model;

// Loop through all records
model.forEach(function(record) {

   let roleColumnValue =
       model.getValue(record, 'NAME');

   let checkboxValue =
       model.getValue(record, 'ENABLED');

   if (
       roleColumnValue === 'Role1' ||
       roleColumnValue === 'Role2' ||
       roleColumnValue === 'Role3'
      ) {

      if (
          roleColumnValue === 'Role3' &&
          checkboxValue === 'Y'
         ) {

         model.setValue(
             record,
             'ENABLED',
             'N'
         );

      }

      if (
          roleColumnValue === 'Role2' &&
          checkboxValue === 'Y'
         ) {

         model.setValue(
             record,
             'ENABLED',
             'N'
         );

      }

      if (
          roleColumnValue === 'Role1' &&
          checkboxValue === 'Y'
         ) {

         model.setValue(
             record,
             'ENABLED',
             'N'
         );

      }

   }

});
Understanding the Logic
The JavaScript code:
- Retrieves the Interactive Grid model.
- Iterates through all rows.
- Checks which role is selected.
- Automatically unchecks the other roles.
- Ensures that only one role remains enabled.
This creates a radio-button-like behavior using checkboxes.
Alternative Optimized Version
A cleaner approach is shown below.
const grid = apex.region("roles_ig")
                 .widget()
                 .interactiveGrid("getViews","grid");

const model = grid.model;

let selectedRecord = model.getRecord(
    model.getSelectedRecords()[0]
);

model.forEach(function(record){

    if(record !== selectedRecord){
        model.setValue(
            record,
            "ENABLED",
            "N"
        );
    }

});
This version automatically unchecks all other rows whenever one checkbox is selected.
Step 8: Run the Page
Run the page and test the behavior.
Example
When Role1 is checked:
Role1 = Y Role2 = N Role3 = NWhen Role2 is checked:
Role1 = N Role2 = Y Role3 = NWhen Role3 is checked:
Role1 = N Role2 = N Role3 = YKnown Issue
You may notice that on initial page load:
Role1 = Yexists in the database, but the checkbox does not appear checked in the Interactive Grid.
This occurs because the grid model has not yet synchronized the checkbox state during initialization.
Possible Fixes
- Refresh the Interactive Grid after page load.
- Use a Dynamic Action on Page Load.
- Set default values through the grid model.
- Use a JavaScript initialization function to synchronize checkbox values.
Benefits of This Approach
✅ Easy to implement
✅ No additional database objects required
✅ Works with editable Interactive Grids
✅ Provides radio-button behavior using checkboxes
✅ Improves user experience
Conclusion
Mutually Exclusive Checkboxes are a common business requirement where users must choose only one option from a list. Using Oracle APEX Interactive Grid and a small amount of JavaScript, you can easily enforce this behavior without creating custom plugins or complex validations.
This approach is lightweight, flexible, and works seamlessly within editable Interactive Grids, making it a practical solution for role selection, approval workflows, status management, and many other real-world Oracle APEX applications.
A dedicated, highly conscientious and proactive Senior Oracle Developer with a strong technical background who possesses self-discipline and the ability to work with the minimum of supervision. My expertise spans in relation to the Oracle Database and it’s tool sets, say, SQL, PL/SQL, Oracle APEX, Forms, Reports and other web technologies like HTML, Javascript, jQuery and CSS. For me, each day is a challenge and an opportunity to learn new things. My aim is to share new things and knowledge to the world of APEX development and enlight the features of Oracle APEX.