
🔹 About
Password-based authentication alone is no longer enough for modern applications.
Adding OTP (One-Time Password) verification improves application security by validating the user through email verification.
In this blog, we will build a complete Email OTP Verification System in Oracle APEX using:
✅ Oracle APEX
✅ PL/SQL
✅ JavaScript
✅ APEX_MAIL
✅ Session State
✅ Dynamic Actions
We will create:
✔ Generate OTP button on Login Page
✔ OTP table for verification
✔ OTP email functionality
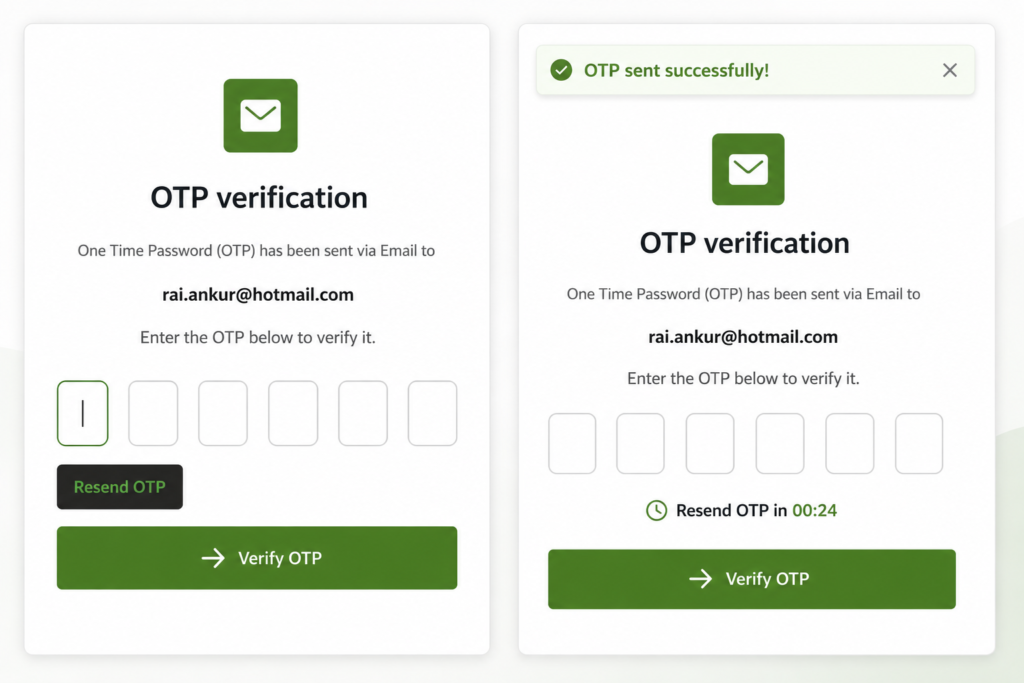
✔ 6-digit OTP input UI
✔ Auto focus OTP boxes
✔ OTP resend functionality
✔ Countdown timer
✔ OTP validation logic
🛠️ Tools and Technologies
- Oracle APEX
- Oracle Database
- SQL
- PL/SQL
- JavaScript
- APEX_MAIL
🚀 What We Are Building
📌 Workflow
User Enters Email & Password
        ↓
Click Generate OTP
        ↓
OTP Sent to Email
        ↓
Redirect to Verify OTP Page
        ↓
Enter 6 Digit OTP
        ↓
Validate OTP
        ↓
Login Success
🚀 Step 1: Create OTP Table
Create a table to store OTP details.
CREATE TABLE otp_log (
    user_email      VARCHAR2(255),
    otp_code        VARCHAR2(10),
    expiry_time     TIMESTAMP,
    is_verified     VARCHAR2(1) DEFAULT 'N'
);
📌 Table Explanation
| Column | Purpose |
|---|---|
| USER_EMAIL | Stores user email |
| OTP_CODE | Generated OTP |
| EXPIRY_TIME | OTP expiry timestamp |
| IS_VERIFIED | Verification status |
🚀 Step 2: Modify Login Button
Change the Login button name to:
Generate OTP🚀 Step 3: Create OTP Generation Process
Create a Page Process on Login Page.
📌 Process Code
DECLARE
    l_otp VARCHAR2(6);
    l_recipient VARCHAR2(255);
BEGIN

    l_recipient := :P9999_USERNAME;

    IF l_recipient IS NULL THEN

        apex_error.add_error (
            p_message          => 'Please enter an email address first.',
            p_display_location => apex_error.c_inline_in_notification
        );

    END IF;

    l_otp := LPAD(
                TRUNC(DBMS_RANDOM.VALUE(0, 999999)),
                6,
                '0'
             );

    INSERT INTO otp_log (
        user_email,
        otp_code,
        expiry_time
    )
    VALUES (
        l_recipient,
        l_otp,
        SYSTIMESTAMP + INTERVAL '5' MINUTE
    );

    apex_mail.send(
        p_to   => l_recipient,
        p_from => 'noreply@yourdomain.com',
        p_body => 'Your OTP is: ' || l_otp,
        p_subj => 'OTP Verification'
    );

    apex_mail.push_queue;

    apex_util.set_session_state(
        'GLOBAL_USER_EMAIL',
        l_recipient
    );

    apex_util.redirect_url (
        p_url => apex_page.get_url(
                    p_page => 38
                 )
    );

END;
🚀 What This Process Does
✔ Generates random 6-digit OTP
✔ Saves OTP into database
✔ Sends OTP email
✔ Stores email in session state
✔ Redirects user to OTP verification page
🚀 Step 4: Create Verify OTP Page
Create a new page:
Page Number: 38
Page Name: Verify OTP
🚀 Step 5: Create OTP Input UI
Create:
✔ 6 Text Fields
✔ Verify Button
✔ Resend OTP Button
✔ Timer Region
📌 Page Items
P38_C1
P38_C2
P38_C3
P38_C4
P38_C5
P38_C6
Each field stores one OTP digit.
🚀 Step 6: Create Input Container Region
Create a Static Content region:
Input ContainerAdd CSS Class:
otp-flex-container🚀 Step 7: Add CSS Styling
Add below CSS in:
Page → CSS → Inline📌 Inline CSS
.otp-flex-container {
    display: flex !important;
    justify-content: center;
    align-items: center;
    gap: 10px;
    margin: 20px 0;
}

.otp-flex-container .t-Form-fieldContainer {
    margin: 0 !important;
    padding: 0 !important;
    flex: 0 1 auto !important;
}

.otp-input-box {
    width: 45px !important;
    height: 55px !important;
    text-align: center;
    font-size: 20px !important;
    border-radius: 8px !important;
    border: 1px solid #ccc !important;
}

#resendBtn {
    color: #4CAF50;
    font-weight: bold;
    text-decoration: none;
}

#resendBtn:hover {
    text-decoration: underline;
}

#otpTimer{
    font-size: 18px;
    font-weight: 700;
    text-align: center;
    margin-top: 10px;
    color: #000;
}
🚀 Step 8: Add JavaScript for Auto Focus
Add below code in:
Page → Execute When Page Loads📌 JavaScript Code
$('#P38_C1').focus();

$(document).on('keyup', '.otp-input-box input', function(e) {

    let $this = $(this);
    let val = $this.val();

    if (val.length === 1) {

        let nextInput = $('.otp-input-box input')
            .eq($('.otp-input-box input').index($this) + 1);

        if (nextInput.length) {
            nextInput.focus();
        }
    }

    if (e.keyCode === 8 && val.length === 0) {

        let prevInput = $('.otp-input-box input')
            .eq($('.otp-input-box input').index($this) - 1);

        if (prevInput.length) {
            prevInput.focus();
        }
    }

});

$(document).on('input', '.otp-input-box input', function() {

    if (this.value.length > 1) {
        this.value = this.value.slice(0, 1);
    }

});
🚀 Features
✅ Auto focus next field
✅ Backspace moves previous field
✅ Prevent multiple characters
🚀 Step 9: Add OTP Timer
📌 JavaScript Timer Code
window.startOtpTimer = function () {

    window.timeLeft = 30;

    if (window.timerId) {
        clearInterval(window.timerId);
    }

    $("#resendBtn").hide();

    $("#otpTimer").html("Resend OTP in 00:30");

    window.timerId = setInterval(function () {

        if (window.timeLeft < 0) {

            clearInterval(window.timerId);

            $("#otpTimer").html("");

            $("#resendBtn").show();

        } else {

            var seconds = window.timeLeft < 10
                ? '0' + window.timeLeft
                : window.timeLeft;

            $("#otpTimer").html(
                "Resend OTP in 00:" + seconds
            );

            window.timeLeft--;

        }

    }, 1000);

};

startOtpTimer();
🚀 Features
✅ Countdown timer
✅ Hide resend button initially
✅ Show resend button after 30 seconds
🚀 Step 10: Create Resend OTP Dynamic Action
Create Dynamic Action on:
RESEND_BTNEvent:
click🚀 True Action 1 → Execute Server-side Code
📌 PL/SQL Code
DECLARE
    l_otp VARCHAR2(6);
    l_recipient VARCHAR2(255);
    l_count NUMBER;
BEGIN

    l_recipient := :GLOBAL_USER_EMAIL;

    SELECT COUNT(*)
    INTO l_count
    FROM otp_log
    WHERE user_email = l_recipient;

    IF l_count > 0 THEN

       DELETE FROM otp_log
       WHERE user_email = l_recipient;

    END IF;

    l_otp := LPAD(
                TRUNC(DBMS_RANDOM.VALUE(0, 999999)),
                6,
                '0'
             );

    INSERT INTO otp_log (
        user_email,
        otp_code,
        expiry_time
    )
    VALUES (
        l_recipient,
        l_otp,
        SYSTIMESTAMP + INTERVAL '5' MINUTE
    );

    apex_mail.send(
        p_to   => l_recipient,
        p_from => 'noreply@yourdomain.com',
        p_body => 'Your OTP is: ' || l_otp,
        p_subj => 'OTP Verification'
    );

    apex_mail.push_queue;

END;
🚀 True Action 2 → Execute JavaScript
window.timeLeft = 30;

clearInterval(window.timerId);

$('#resendBtn').hide();

$('#P38_TIMER').show();

window.timerId = setInterval(
    window.countdown,
    1000
);

apex.message.showPageSuccess(
    "OTP sent successfully!"
);

startOtpTimer();
🚀 Step 11: Verify OTP Process
Create Verify Button Process.
📌 Verification Logic
DECLARE

    l_entered_otp VARCHAR2(6);
    l_count NUMBER;

BEGIN

    l_entered_otp :=
          :P38_C1
       || :P38_C2
       || :P38_C3
       || :P38_C4
       || :P38_C5
       || :P38_C6;

    SELECT COUNT(*)
    INTO l_count
    FROM otp_log
    WHERE user_email = :GLOBAL_USER_EMAIL
    AND otp_code = l_entered_otp
    AND expiry_time >= SYSTIMESTAMP;

    IF l_count > 0 THEN

        UPDATE otp_log
        SET is_verified = 'Y'
        WHERE user_email = :GLOBAL_USER_EMAIL;

        apex_authentication.login(
            p_username => :GLOBAL_USER_EMAIL,
            p_password => null
        );

    ELSE

        apex_error.add_error (
            p_message =>
                'Invalid or Expired OTP',
            p_display_location =>
                apex_error.c_inline_in_notification
        );

    END IF;

END;
🚀 Final Output
Your application now supports:
✅ Secure OTP authentication
✅ Email verification
✅ Auto OTP input navigation
✅ OTP resend functionality
✅ Countdown timer
✅ Modern OTP UI
📌 Real-Time Use Cases
This type of OTP authentication is useful in:
✔ Banking Applications
✔ HR Systems
✔ Enterprise Portals
✔ Approval Applications
✔ Customer Login Systems
✔ Secure Internal Applications
🎯 Benefits of OTP Verification
✅ Improved security
✅ Reduced password risk
✅ Better authentication flow
✅ Modern login experience
✅ Secure email validation
🎉 Conclusion
Building OTP authentication in Oracle APEX is easier than many developers think.
Using:
✅ APEX_MAIL
✅ PL/SQL
✅ JavaScript
✅ Dynamic Actions
✅ Session State
you can create a secure and professional OTP verification system with minimal code.
This approach provides a modern authentication experience for enterprise Oracle APEX applications.
Hi, I’m Ankur Rai, an Oracle APEX Developer with 6+ years of professional experience in building enterprise applications. I specialize in creating scalable and efficient solutions using Oracle APEX, PL/SQL, and SQL to solve real-world business challenges.
I am a 3X Oracle APEX Professional Certified Developer and also an Oracle ACE Associate Member, actively contributing to the Oracle community by sharing knowledge, insights, and best practices. Through my blogs, I aim to help developers learn, grow, and build better Oracle APEX applications together.


Hi I have tried to replicate your approach…but when I click on Generate OTP button (ex login), I’m not redirect to page 38, I still remain on login page.
How ca n I solve this?
DECLARE
l_otp VARCHAR2(6);
l_recipient VARCHAR2(255);
BEGIN
l_recipient := :P9999_USERNAME;
IF l_recipient IS NULL THEN
apex_error.add_error (
p_message => ‘Please enter an email address first.’,
p_display_location => apex_error.c_inline_in_notification
);
END IF;
l_otp := LPAD(
TRUNC(DBMS_RANDOM.VALUE(0, 999999)),
6,
‘0’
);
INSERT INTO otp_log (
user_email,
otp_code,
expiry_time
)
VALUES (
l_recipient,
l_otp,
SYSTIMESTAMP + INTERVAL ‘5’ MINUTE
);
apex_mail.send(
p_to => l_recipient,
p_from => ‘noreply@yourdomain.com’,
p_body => ‘Your OTP is: ‘ || l_otp,
p_subj => ‘OTP Verification’
);
apex_mail.push_queue;
apex_util.set_session_state(
‘GLOBAL_USER_EMAIL’,
l_recipient
);
apex_util.redirect_url (
p_url => apex_page.get_url(
p_page => 38
)
);
END;
Please create new process on login page with on Login Button click