Oracle APEX Interactive Grid (IG) is extremely powerful, but sometimes we need richer user interactions without relying on third-party plug-ins—especially in restricted enterprise environments.
In this article, we’ll explore how to use HTML Expression, Inline Popup, and Template Directives together to display contextual information directly from an Interactive Grid. This approach allows users to view detailed employee and department information via action buttons, all while keeping the grid clean and user-friendly.
✅ No plug-ins
✅ Fully native APEX solution
✅ Clean UI with contextual popups
Tools & Technologies Used
- Oracle APEX
- Interactive Grid
- HTML Expression
- Inline Popup
- Template Directives
- JavaScript
- APEX Actions & Dynamic Actions
Use Case Overview
We will:
- Display Employee Info using a descriptive column
- Show Department Info from another table
- Trigger Inline Popups directly from Interactive Grid rows
- Conditionally enable/disable buttons using Template Directives
Step-by-Step Implementation
1️⃣ Create an Interactive Grid on EMP Table
Create a new Interactive Grid region based on the EMP table.
Modify the IG SQL query as follows:
SELECT EMPNO,
       ENAME,
       JOB,
       MGR,
       HIREDATE,
       SAL,
       COMM,
       DEPTNO,
       'This employee has manager: ' || MGR ||
       ' and department: ' || DEPTNO AS emp_info,
       '' AS detail
  FROM EMP
📌 Note:
Instead of EMP_INFO, you can use any large descriptive column such as PROJECT_DESCRIPTION, PRODUCT_DESCRIPTION, or NOTE.
2️⃣ Column Configuration
- Set EMP_INFO
- Type: Hidden
- Set DETAIL
- Type: HTML Expression
3️⃣ Add HTML Expression Code
Go to DETAIL → Settings → HTML Expression and add:
<button data-action="#action$show-info?info=%22&EMP_INFO.%22"
        type="button"
        title="Employee Detail"
        aria-label="Employee Detail"
        class="t-Button t-Button--noLabel t-Button--icon t-Button--simple t-Button--small t-Button--hot">
  <span aria-hidden="true" class="t-Icon fa fa-info-square-o"></span>
</button>

<button data-action="#action$dept-info?id=&DEPTNO."
        type="button"
        title="Department Info"
        aria-label="Department Info"
        class="t-Button t-Button--noLabel t-Button--icon t-Button--simple t-Button--small t-Button--hot">
  <span aria-hidden="true" class="t-Icon fa fa-window-clock"></span>
</button>
4️⃣ Create Hidden Page Item
Create a page item:
- Name: Pxx_DEPTNO
- Type: Hidden
- Value Protected: Off
5️⃣ Create Department Info Popup (Classic Report)
Create a Classic Report region on the DEPT table.
Source
- Where Clause:
DEPTNO = :Pxx_DEPTNO- Page Items to Submit: Pxx_DEPTNO
Appearance
- Template: Inline Popup
- Template Options:
- Display Popup Callout ✔
- Size: None
- CSS Classes: js-dialog-size600x145
Advanced
- Static ID: dept-info
- Custom Attributes:
style="display: none"Attributes
- Template: Contextual Info
- Template Option: Stacked
6️⃣ Create Employee Info Popup (Static Content)
Create a Static Content region.
Source
<p id="info-text"></p>Appearance
- Template: Inline Popup
- Template Options:
- Display Popup Callout ✔
- Size: None
- CSS Classes: js-dialog-size512x136
Advanced
- Static ID: info-popup
- Custom Attributes:
style="display: none"7️⃣ Create Dynamic Action (Department Info)
Event: Click
Event Scope: Dynamic
When
- Selection Type: jQuery Selector
- Selector: .dept-info
True Actions
1. Set Value
- Set Type: JavaScript Expression
- Expression:
this.triggeringElement.dataset.deptNo;
Item: Pxx_DEPTNO
2. Execute JavaScript Code
var o = {
  autoOpen: true,
  parentElement: this.triggeringElement,
  callout: true,
  relativePosition: "below"
};
$('#dept-info').popup(o);
3. Refresh Region
- Region: Dept Info Popup
4. Open Region
- Region: Dept Info Popup
8️⃣ Add JavaScript (Execute When Page Loads)
$(function() {
   apex.actions.add([
      {
         name: 'show-info',
         title: 'Employee Info',
         action: (event, element, args) => {
            var o = {
               autoOpen: true,
               parentElement: element,
               callout: true,
               relativePosition: "below"
            },
            info = decodeURIComponent(JSON.parse(args.info));

            $('#info-text').text(info);
            $('#info-popup').popup(o);
            return true;
         }
      },
      {
         name: 'dept-info',
         title: 'Department Info',
         action: (event, element, args) => {
            var o = {
               autoOpen: true,
               parentElement: element,
               callout: true,
               relativePosition: "below"
            };

            $s('P243_DEPTNO', args.id);
            apex.region('dept-info').refresh(false);
            $('#dept-info').popup(o);
            return true;
         }
      }
   ]);
});
9️⃣ Run the Page 🎉
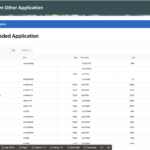
You’ll now see:
- An Employee Info popup showing descriptive text
- A Department Info popup displaying live data from the DEPT table
- Popups anchored contextually below the clicked button
Bonus: Conditional Button Enable/Disable Using Template Directives
To disable the Department Info button for OPERATIONS (DEPTNO = 40), update the HTML Expression:
<button {case !DEPTNO/}{when 40/}data-action="#action$dept-info?id=&DEPTNO."{endcase/}
        type="button"
        {case DEPTNO/}{when 40/}disabled{endcase/}
        title="Department Info"
        aria-label="Department Info"
        class="t-Button t-Button--noLabel t-Button--icon t-Button--simple t-Button--small t-Button--hot">
  <span aria-hidden="true" class="t-Icon fa fa-window-clock"></span>
</button>
🔒 The button will now be disabled for the OPERATIONS department.
Output

Conclusion
When plug-ins are not an option, combining HTML Expression, Template Directives, and Inline Popup provides a powerful, clean, and fully native Oracle APEX solution.
This approach:
- Enhances user experience
- Keeps grids uncluttered
- Avoids page navigation
- Works seamlessly with Interactive Grids
✨ The combination of HTML Expression + Template Directives + Inline Popup is truly awesome!
Love coding? Me too! Let’s keep in touch – subscribe to my website for regular chats on Oracle APEX, PL/SQL,SQL JavaScript, and CSS.